RDS | User Manual
Version 3.0.0 – Mar 10th 2023
Table of Contents
- Introduction
- Confidential Information
- Support
- Definitions
- Sign in View
- My Projects View
- Projects Files View
- FAQs
- Contact Us
Introduction
Research Data Storage (RDS) is an application developed by the Cancer Digital Intelligence (CDI) Program at Princess Margaret as part of a CFI grant on Precision Medicine. The purpose of the application is to provide central storage for raw data files that do not have established data storage solutions.
The files uploaded to RDS are stored in UHN’s local ECS S3 instance, located inside the UHN network. The file storage is monitored, patched, and backed up regularly, resulting in greater data security against inappropriate access or inadvertent loss than storing the data on local or portable hard drives.
Confidential Information
Please do not upload any files containing patient health information (PHI). Do not distribute the data stored in RDS outside of UHN except as explicitly stated in an REB-approved protocol or UHN legal agreement.
Support
Please send any comments, questions, and feedback about RDS or this document to pmcdi@uhn.ca.
Definitions
Project: A project is a container for a collection of data files relating to a research question. Only users assigned to a project can see the contents of that project. Data files can be organized within a project using folders and subfolders.
Folder/Subfolder: A subfolder is a container within a project that collects and organizes data files or child subfolders.
Role: User roles are assigned on a project-by-project basis and control access level to that project. An RDS user can have different roles on different projects, and therefore different access privileges.
RDS has three roles:
- Owner
- Member
- Observer
| Permissions Matrix | Owner | Member | Observer |
|---|---|---|---|
| Creating projects | |||
| Create a project* | Yes | No | No |
| Delete a project | Yes | No | No |
| View project details | Yes | Yes | Yes |
| Define project metadata | Yes | No | No |
| Edit project metadata | Yes | No | No |
| View project metadata | Yes | Yes | Yes |
| View shared project(s) | Yes | Yes | Yes |
| User Management | |||
| Add/Update RDS user to Owner role | Yes | No | No |
| Add/Update RDS user to Memeber role | Yes | Yes | No |
| Add/Update RDS user to Observer role | Yes | Yes | No |
| Remove Owner | Yes | No | No |
| Remove Member | Yes | Yes | No |
| Remove Observer | Yes | Yes | No |
| View users on a project | Yes | Yes | Yes |
| Files within a project | |||
| Upload file(s) to a project | Yes | Yes | No |
| Download file(s) within a project | Yes | Yes | Yes |
| Delete file(s) within a project | Yes | Yes | No |
| Rename file(s) | Yes | Yes | No |
| Move file(s) | Yes | Yes | No |
| View project file(s) | Yes | Yes | Yes |
| Folders/subfolders within a project | |||
| Create a folder | Yes | Yes | No |
| Rename a folder | Yes | Yes | No |
| Upload folder(s) | Yes | Yes | No |
| Download folder(s) | Yes | Yes | Yes |
| Delete a folder | Yes | Yes | No |
| Move folder(s) | Yes | Yes | No |
| View folder details | Yes | Yes | Yes |
| File details | |||
| Define file(s) details** | Yes | Yes | No |
| Edit file(s) details** | Yes | Yes | No |
| View file details | Yes | Yes | Yes |
| File Metadata | |||
| Define file(s) metadata** | Yes | Yes | No |
| Edit file(s) metadata** | Yes | Yes | No |
| View file(s) metadata** | Yes | Yes | Yes |
|
* Any user can create a project and will be assigned the role of project owner **Features not yet implemented |
|||
Sign In View
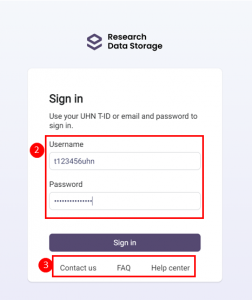
- Go to: https://rds.uhn.ca
- To access RDS, connect to the UHN network, either directly or via VPN, to access RDS. Connect to VPN via the GlobalProtect application. Contact UHN Digital for assistance with setting up a remote connection.
- To access RDS, connect to the UHN network, either directly or via VPN, to access RDS. Connect to VPN via the GlobalProtect application. Contact UHN Digital for assistance with setting up a remote connection.
- Sign in to RDS using UHN credentials
- UHN credentials include T-id number, RIS username or UHN email
- On the webpage you will see a series of hyperlinks that can be clicked to access Contact Us, FAQ and Help Center:
- Contact Us: Click to send any comments, questions, and feedback about the application, and suspected software bugs to the RDS team
- FAQ: Click to access a PDF of frequently asked questions. Don’t see your question? Submit your question to our team using the Contact us button
- Help Center: Click to access RDS User Manual
My Projects View
- My Projects table displays all projects assigned to a user with the following details:
- Name: name of the project
- Team: number of users in each project
- My role: role of the user in the project
- Created on: date the project was created
- Created by: name of the user who created the project
- Size: size of the project files
- Note: any column header can be clicked to sort the list by ascending or descending values in that column
- Access additional support:
- Help Center: Access the RDS User Manual
- About RDS: Learn about RDS
- Send Feedback: Send questions, report a bug, and suggest new functionality to the RDS team.
- Enter your institutional email and your message to send directly to the RDS team
- Logout of RDS:
- Click the user name to log out of RDS
- Create a Project:
- Click + New Project button
- Create new project modal appears, and enter the following information:
- Project name
- Invite users and collaborators to the project. Only users with UHN access can be added to the project
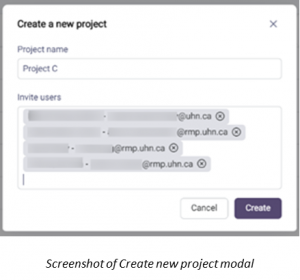
- Click Create button to make a new project or the Cancel button to close the modal
- Creating a project will automatically assign the creating user as the project Owner. All other users added to the project will be assigned the role of Observer. User roles can be changed in the right-side panel.
- Users added to the project will receive an automated email from RDS to alert them to the project they’ve been added to, their role when added (Observer), with a link to the RDS log-in screen.

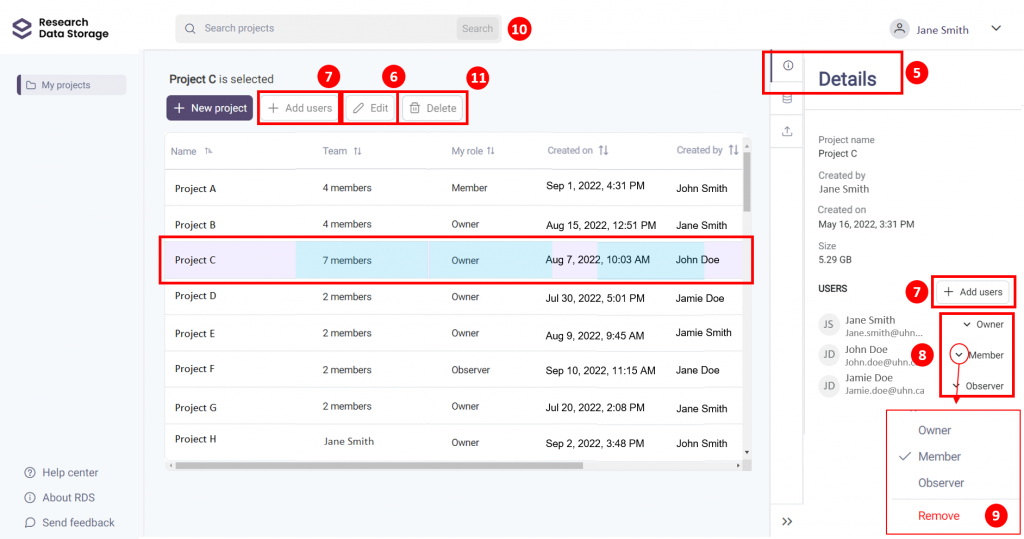
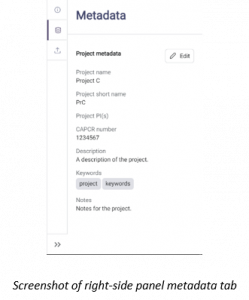
- View project details & metadata:
- Click on a project
- Right-side panel opens to the details tab (i) automatically, displaying project creation details as well as users assigned to the project and their roles.
- Project details cannot be edited
- Users can be added to a project and roles can be updated from the R-panel, see section 7 below
- Click on the stack tab (below details tab) to view metadata
- Project metadata can be edited, see section 6 below
- Add/edit project metadata:
- Click Edit button
- Edit project modal appears
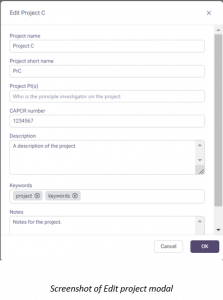
- Enter new details or edit existing details
- Add principal investigator(s) by entering their email address, first name or last name into the PI field
- Select from a list of matches in the UHN Active Directory
- The list of matches will show up to 50 entries. If the intended user does not appear in the list, refine the search term to conduct a more specific search of the database
- Adding a PI in project details does not automatically add the PI as a user on the project, this step must be completed separately
- For keywords that describe the project, click Enter to separate keyword entries
- Click OK button to save details
- Click Edit button
- Add users to project:
- Select project from the table
- Click Add users button above table or in the R-panel
- Add users modal appears
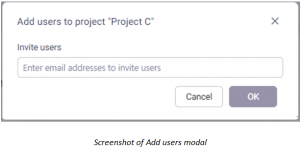
- Add users modal appears
- Enter email address, first name or last name to invite team members
- Select from a list of matches in the UHN Active Directory
- The list of matches will show up to 50 entries. If the intended user does not appear in the list, refine the search term to conduct a more specific search of the database
- Click OK button
- Update user role
- Select project and open R-panel details tab (i)
- Click downward arrow beside the user of interest
- Select the new role from the dropdown menu
- User role will update
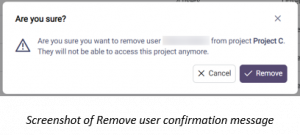
- Remove user from a project
- Select project and open R-panel details tab (i)
- Click downward arrow beside the user of interest
- Click Remove
- Confirmation message will appear
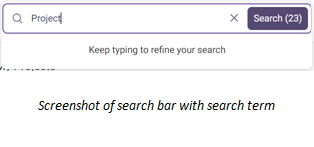
- Search for a project, file or folder
- Click into the search bar
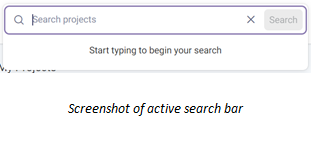
- Start typing to begin the search
- Live search will begin when 3+ characters are entered
- Search button will show the number of matches returned
- Click the search button to go to the search results page
- Search will return matches of the search term found within the project name, project short name, CAPCR number, description, keywords and/or notes fields for My Projects, and will return file name or folder name for items within projects
- The search page will display all exact matches and partial matches related to the search term
- Note: a search for less than 3 characters can be performed by clicking the search button, however the live search (results listed in button) will not generate
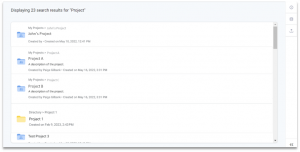
- Select the match to open the R-panel and view project/file/folder details or metadata
- Click on the project name to enter that project, the folder name to enter that folder, or the file name to enter the location of that file
- Click into the search bar
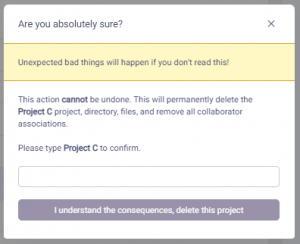
- Delete a project
- Select the project to be deleted
- Note: Only owners of projects can delete the project
- Click Delete button
- The Delete project modal appears
- Select the project to be deleted
-
- Once a project is deleted it cannot be undone, thus the modal requires that the user confirm the action by typing in the project name
- To cancel, use the x in the top right corner of the modal
- Once the correct project name has been entered, click I understand the consequences, delete the project
- The project will be deleted from the My Projects page for all users upon their next log in to RDS
- Once a project is deleted it cannot be undone, thus the modal requires that the user confirm the action by typing in the project name
Project Files View
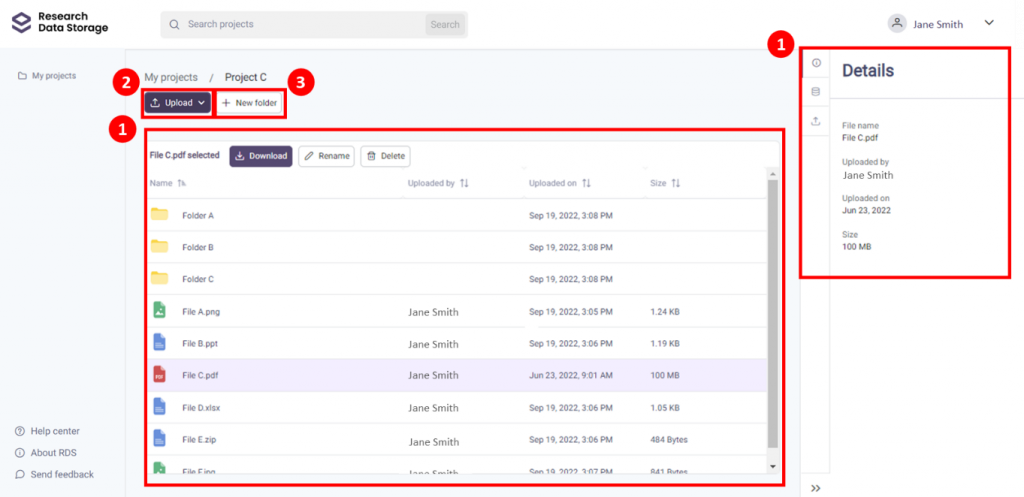
- View project files:
- Click on project name in My Projects table to enter Project Files view
- Project Files table displays the following details:
- Name: name of the file or folder
- Uploaded on: date the file was uploaded or folder was created
- Uploaded by: the user that uploaded the file or created the folder
- Size: the size of the file
- Note: any column header can be clicked to sort the list by ascending or descending values in that column
- Select a file from the table
- R-panel opens information tab (i) to display file details
- Upload file(s) and/or folder(s):
- Either:
- Drag file(s) and/or folder(s) from your computer and drop into the Project Files table, or
- Drag file(s) and/or folder(s) from your computer and drop into the Project Files table, or
- Click the Upload button
- Select either File or Folder option
- A message appears with notice of restriction against uploading PHI
- Click Continue to Upload button to continue
- Browser dialogue box opens
- Select file(s) or folder from local computer
- To select multiple files, use Shift or Ctrl keys while selecting files
- Note: this does not work for selecting multiple folders when uploading via the upload button. To bulk upload folders, use the drag and drop method
- Click Open button
- To select multiple files, use Shift or Ctrl keys while selecting files
- R-panel will open to the Progress tab to display all items uploading and their progress
- Click x to cancel upload of individual files, folders, or overall upload
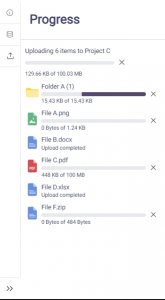
- Click x to cancel upload of individual files, folders, or overall upload
- Uploaded files and folders will appear in the Project Files table
- Repeat the steps above to add additional files and/or folders to the upload queue
- Please note: In the event of a network interruption during upload, RDS will notify user of the interrupted upload
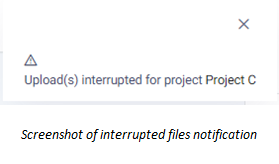
- Click the project name in the notification to go to the project
- Click the 3rd tab in R-panel to view interrupted file(s)
- To proceed with interrupted upload, repeat upload steps
- Click Clear All button to clear interrupted item(s)
- Either:
- Create new folder/subfolder:
- Click on + New Folder button
- New Folder modal will appear

- New Folder modal will appear
- Enter folder name
- Click OK button
- Click on + New Folder button
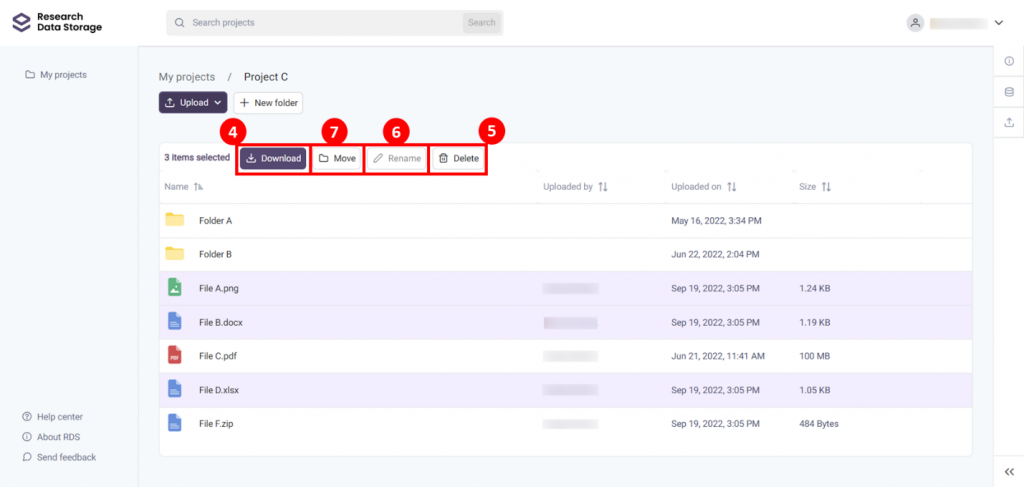
- Download file(s) and/or folder(s)
- Select the file(s) and/or folder(s) of interest from the Project Files table
- To select multiple, use Shift or Ctrl keys while selecting items
- Click Download button
- Selected items download to local computer downloads folder
- Select the file(s) and/or folder(s) of interest from the Project Files table
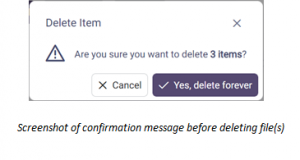
- Delete file(s) and/or folder(s)
- Select the file(s) and/or folders(s) of interest from the Project Files table
- To select multiple, use Shift or Ctrl keys while selecting items
- Click Delete button
- Confirmation message will appear
- Confirmation message will appear
- Click Yes, delete forever button
- Select the file(s) and/or folders(s) of interest from the Project Files table
- Rename file or folder name
- Select the file or folder of interest from the Project Files table
- Rename button will become active
- Click Rename button
- Rename modal will appear
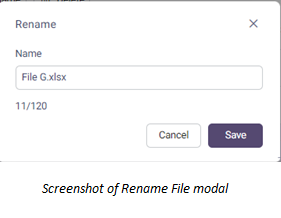
- Enter the new file or folder name, if renaming a file, include file extension (e.g. .xlsx, .docx, .pdf)
- Name including extension must not exceed 120 characters
- Name must be unique (i.e. not duplicated by another file or subfolder in the current folder)
- Click Save button
- Move file(s) and/or folder(s)
- Select the file(s) and/or folder(s) to be moved
- Click the Move button
- Move Modal appear
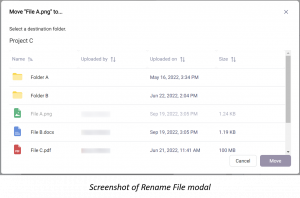
- Select the destination folder
- Either select from the sub-folders until the destination folder is reached, or
- Click the breadcrumbs to reach a higher-level folder location
- Click Move button
- File(s) and/or folder(s) will appear in the destination folder once the transfer has been completed
- Note: files and folders cannot be renamed or deleted until the move has been completed, likewise, a new upload cannot be initiated until the move has been completed
FAQ
Q: How do I log in to RDS?
A: To log in to RDS, use your UHN-affiliated account credentials. Accepted credentials include t-ID, RMP ID, RIS ID, or UHN email.
Q: How long can I be idle in RDS before the system logs me out?
A: 2 minutes. After 2 minutes of inaction, you will be logged out of the system.
Q: How do I get access to a project in RDS?
A: The project owner or a member of the project must add you to the project. For details on adding users to projects or role permissions, please refer to the user manual sections “Definitions” and “Add Project User and Roles”.
Q: How do I share my files with someone?
A: You can add anyone from UHN as a user on your project and they will have access to the files in your project. For details on how to add a user to a project, please refer to the user manual section “Add Project User and Roles”.
Q: Can I share my files with external collaborators?
A: Yes. External collaborators can be added to your project, as long as they are in the UHN Active Directory. For details on how to add a user to a project, please refer to the user manual section “Add Project User and Roles”.
Q: Who has access to my files in RDS?
A: Project owners, members, and observers have access to all files within a project. RDS system administrators also have access. For details on user permissions, please refer to the user manual section “Definitions”.
Q: Who can delete my files?
A: Project owners and members assigned to a project can delete files, regardless of who uploaded it. For details on deleting project files and user permissions, please refer to the user manual sections “Definitions” and “Deleting Files”.
Q: Can I recover a deleted file?
A: No. Once a file is deleted from RDS, it cannot be recovered. Any deleted files will have to be reuploaded.
Q: Can I open my files within RDS?
A: No. To open a file, first download the file and open it on your computer.
Q: How long are my files stored for?
A: Indefinitely.
Q: How much space is available in RDS?
A: Unlimited. This may change in the future.
Q: What is the file size limit?
A: Files up to 20 GB can be uploaded into RDS.
Q: Can I search for a file within RDS?
A: Yes, you can search for files within projects you have access to.
Q: What is the difference between a project and a folder?
A: A project is a collection of files and folders that relate to a single research project and has one Principal Investigator (PI). A folder is a collection of files grouped together within a project. A project can have multiple folders.
Q: Is RDS replacing UHN Portal?
A: RDS is not replacing any system at UHN. RDS is providing a space to store research data files that otherwise have no good place to be stored.
Q: What’s the difference between RDS and UHN FileShare?
A: UHN FileShare allows UHN staff to share files up to 800MB. RDS provides file storage, management and sharing for files up to 20 GB.
Q: What’s the difference between RDS and OneDrive?
A: RDS is designed specifically for files coming from research equipment that accounts for file metadata, which makes the files more findable, accessible, interpretable, and reusable (FAIR principle). RDS gives users unlimited storage capacity. OneDrive is limited to 1TB.
Don’t see your question here? Submit your question to our team at pmcdi@uhn.ca.
Contact us
We hope you enjoy using RDS! Please send any comments, questions, and feedback about the application or this document to pmcdi@uhn.ca.